Repotting is an essential part of plant care, and knowing when and how to do it is key to ensuring the health and growth of your plants. Over time, plants outgrow their pots and need more space to continue thriving. Repotting at the right time can promote healthy root growth and prevent plants from becoming root-bound. In this guide, we will walk you through the process of repotting your plants, including when to repot, how to do it, and the materials you’ll need.
Why Repotting Is Important
Repotting allows plants to thrive by giving their roots more space to grow and access to fresh nutrients. As plants grow, their roots can fill up the pot, restricting their ability to absorb water and nutrients. Repotting provides several benefits:
- Promotes Healthy Root Growth: When plants are root-bound, their roots can become tangled and overcrowded. Repotting allows the roots to spread out and grow properly.
- Refreshes the Soil: Over time, the nutrients in the soil can be depleted. Repotting allows you to refresh the soil with nutrient-rich potting mix to support new growth.
- Prevents Stress: A cramped pot can cause stress on the plant, making it more susceptible to disease and poor growth. Repotting reduces this stress and helps the plant grow more vigorously.
When to Repot Your Plants
Knowing when to repot your plants is crucial. Here are the signs that indicate your plant needs repotting:
- Roots Are Growing Out of the Drainage Holes: If you see roots emerging from the bottom of the pot, it’s a clear sign that your plant has outgrown its current pot.
- The Plant Is Top-Heavy: If the plant has become too large for its pot and is tipping over, it’s time to repot it into a larger container.
- Soil Drains Too Quickly: If the soil dries out too quickly after watering, it may be a sign that the roots are filling the pot and the soil is no longer able to retain enough moisture.
- Slow Growth: If your plant’s growth has slowed down significantly, even with regular care, it may be root-bound and in need of more space.
- Roots Are Circling the Pot: When you remove the plant from the pot and see roots circling around the edges, this is a sign of a root-bound plant, and it’s time to repot.
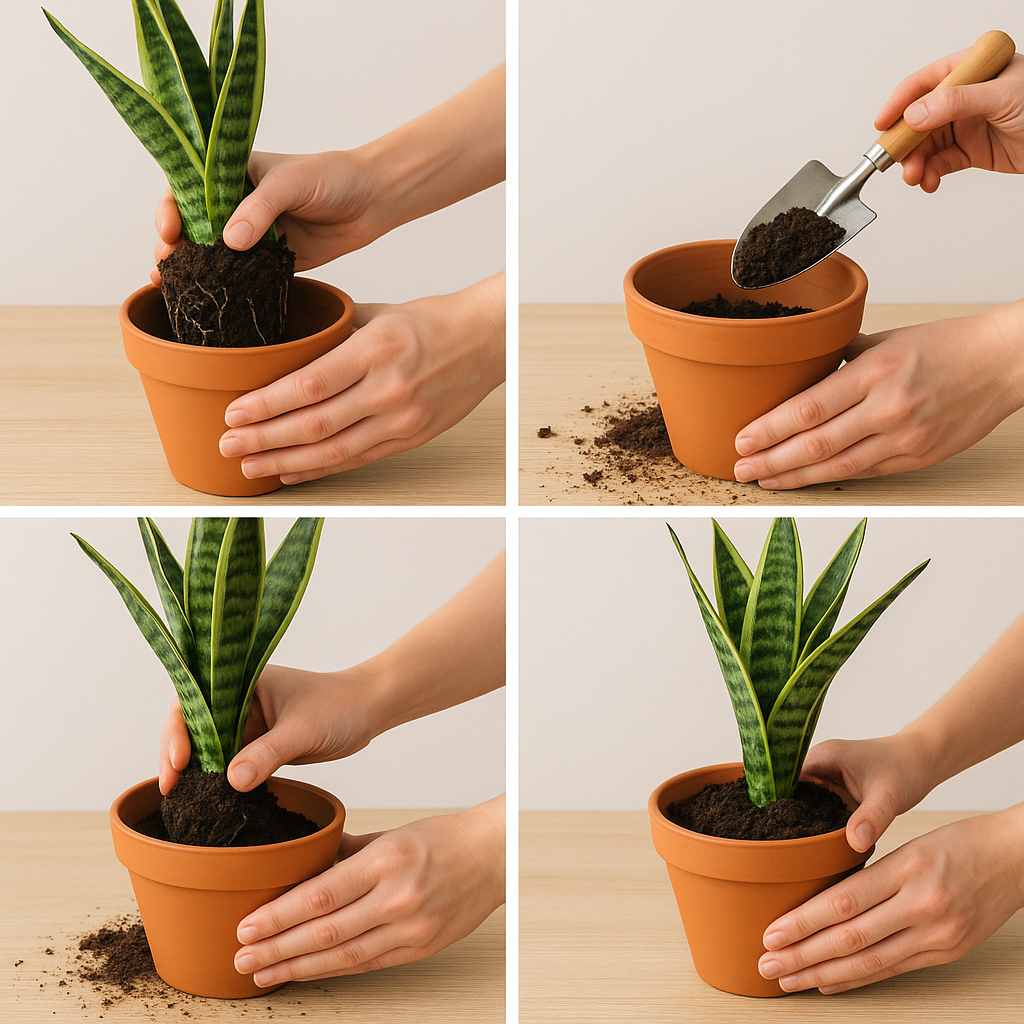
How to Repot Your Plants
Repotting can seem intimidating, but with the right tools and a little preparation, it’s a simple process. Follow these steps to repot your plants correctly:
1. Choose the Right Pot
Select a pot that is 1-2 inches larger in diameter than the current pot. Avoid choosing a pot that is too large, as excess soil can retain moisture and cause root rot. The new pot should have proper drainage holes to allow water to escape.
2. Prepare the Potting Mix
Use a high-quality potting mix that is appropriate for your plant type. For most plants, a well-draining mix with peat moss, perlite, and vermiculite works well. Make sure the mix is fresh and nutrient-rich.
3. Remove the Plant from Its Old Pot
Gently remove the plant from its current pot. You can do this by carefully squeezing the sides of the pot to loosen the soil. If the plant is root-bound, you may need to gently break apart the roots to encourage them to grow outward.
4. Inspect the Roots
Check the roots for any signs of rot or damage. Trim away any brown, mushy, or dead roots with sterile pruning shears. If the plant is root-bound, loosen the roots gently with your fingers to encourage new growth.
5. Place the Plant in the New Pot
Place the plant in the center of the new pot and fill around the roots with fresh potting mix. Ensure that the plant is at the same depth it was in the previous pot. Tap the pot gently to settle the soil and remove air pockets.
6. Water Thoroughly
Water the plant well after repotting to help settle the soil around the roots. Make sure the water drains through the bottom of the pot, and allow any excess water to escape.
Tips for Successful Repotting
- Repot during the growing season: It’s best to repot plants during their active growing period, typically in spring or early summer. This helps them recover from the shock of being moved.
- Don’t overwater: After repotting, avoid overwatering. Let the soil dry out slightly between waterings to prevent root rot.
- Avoid disturbing the roots too much: Be gentle when handling the roots to avoid causing unnecessary damage. Only trim the roots if necessary.
- Give the plant time to adjust: After repotting, place the plant in a location with indirect sunlight to help it adjust. Avoid exposing it to direct sunlight immediately after the process.
Interested in learning more about plant care? Check out our guide to maintaining healthy houseplants for more expert tips.
Conclusion
Repotting your plants is an essential task for ensuring their continued health and growth. By recognizing when your plants need repotting and following the correct process, you can promote healthy roots, fresh soil, and vibrant growth. With these tips, you can successfully repot your plants and watch them thrive in their new environment.
Looking for high-quality pots and potting mixes for your plants? You can find all the materials you need, including pots, soil, and tools, on Amazon.