Looking to make the most of unused space in your garden, balcony, or patio? One smart and stylish solution is to build a tiered pot display for corners. This DIY project maximizes vertical space, adds depth to your plant arrangements, and gives your garden a clean, organized look.
In this complete step-by-step guide, you’ll learn how to create your own tiered plant stand using affordable materials and basic tools—perfect for anyone who wants a functional and eye-catching corner display.
Why Choose a Tiered Pot Display?
A tiered pot stand is ideal for:
- Small spaces: Use vertical space instead of crowding plants on the floor.
- Better light exposure: Helps each pot get more sunlight.
- Improved drainage: Keeps pots elevated and prevents water pooling.
- Visual appeal: Adds height, symmetry, and dimension to your plant collection.
This is a beginner-friendly project with a big visual payoff.
Materials You’ll Need
Here’s a list of materials you can easily find online or at your local hardware store:
- 3 wooden boards or crates (different sizes for each tier)
- 3–5 terracotta or decorative pots
- Sandpaper
- Wood screws and screwdriver or drill
- Wood glue (optional)
- Measuring tape
- Wood stain or outdoor paint (optional)
- Level
- L-brackets (for added stability)
- Protective sealant (for outdoor use)
💡 Where to buy: You can find durable wooden crates and basic tools at Home Depot.
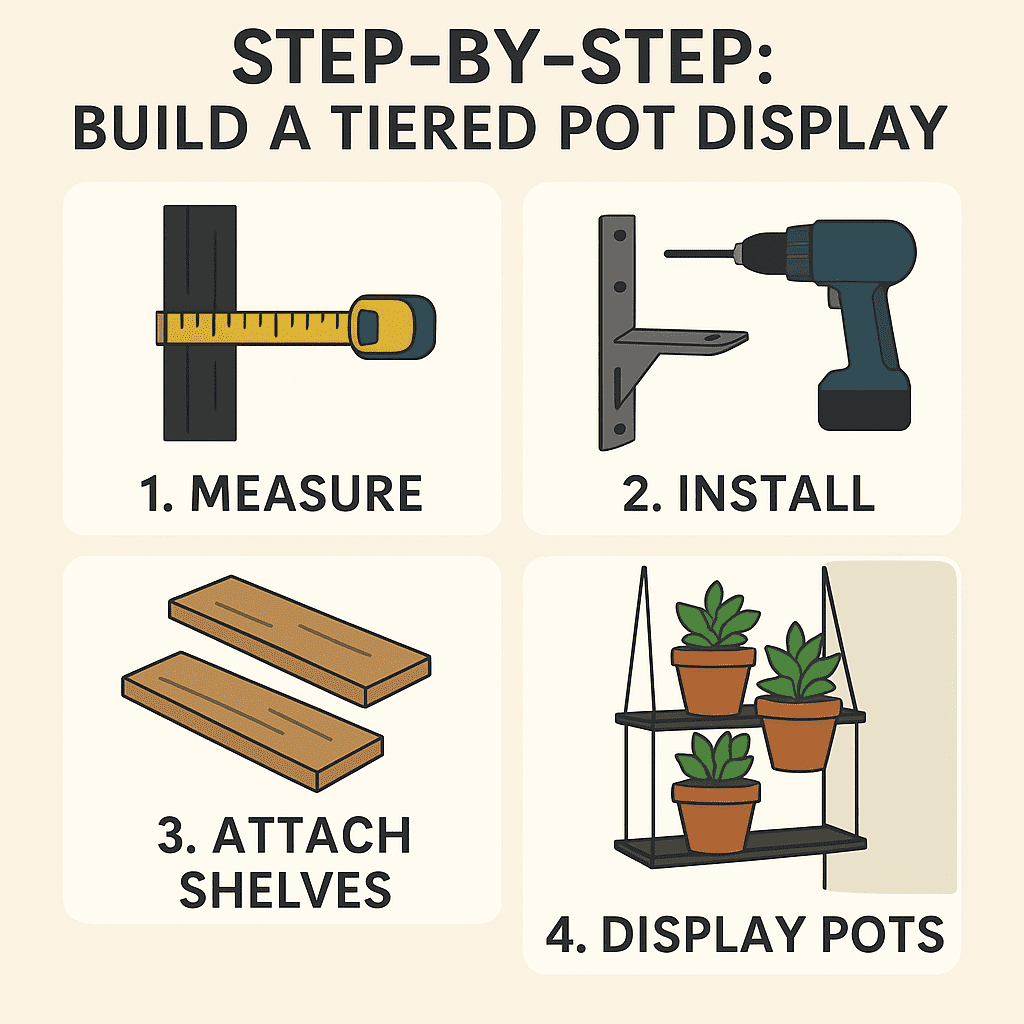
Step-by-Step: Build a Tiered Pot Display for Corners
Step 1: Measure the Corner
Use a measuring tape to determine how much space is available in the corner. This will help you choose the right dimensions for your boards or crates and prevent overcrowding.
Tip: Leave some extra space around the display for airflow and easy watering access.
Step 2: Prepare the Wood
- Sand the boards or crates to smooth out rough edges.
- If using raw wood, apply wood stain or paint for protection and aesthetics.
- Let everything dry completely before assembly.
Step 3: Arrange Your Tiers
- Place the largest board or crate on the ground as the base.
- Stack the second tier slightly back and off-center.
- Top with the smallest tier.
Use a level to ensure stability. You can also angle the stand slightly inward to hug the corner.
Step 4: Secure the Structure
- Screw the boards together where they meet. Use L-brackets for extra support if needed.
- Add a dab of wood glue between tiers before screwing to improve hold (optional).
- Let everything set for at least 1 hour.
For outdoor use, finish with a water-resistant sealant to extend the life of your display.
Step 5: Add Your Pots
- Choose a mix of plants with varied heights, textures, and colors.
- Place heavier pots on the bottom tier for balance.
- Use the top tier for trailing plants or small herb pots.
Make sure each plant has enough space for airflow and sunlight.
Design Ideas to Customize Your Tiered Display
- Paint it white or black for a modern, minimalist look.
- Use reclaimed wood for a rustic or farmhouse vibe.
- Add wheels to make it mobile and easy to reposition.
- Install hooks on the side to hang tools or mini pots.
Want more eco-friendly inspiration? Don’t miss our tips on DIY planters made from recycled materials.
Maintenance Tips
- Clean the surface regularly to remove soil or algae buildup.
- Reapply sealant once a year if used outdoors.
- Rotate pots occasionally to prevent uneven growth.
- Check for loose screws or warped wood every few months.
Conclusion: A Simple DIY with Big Impact
Now that you know how to build a tiered pot display for corners, you can transform even the smallest space into a beautiful vertical garden. It’s practical, affordable, and a great way to showcase your favorite plants in style.
🌿 Save this guide for your next planting weekend!
🪴 Share it with a friend who loves clever DIY garden solutions!
FAQ – Tiered Pot Displays
How much weight can each tier hold?
It depends on the wood and build quality. For standard pine or crates, each tier can support up to 10–15 lbs safely when properly secured.
Can I use this display indoors?
Yes! Just be sure to use waterproof trays or liners under each pot to protect flooring.
Do I need power tools?
A basic screwdriver works, but a power drill speeds up assembly. This project is beginner-friendly either way.
Looking for the perfect tiered stand or brackets to build your display? This adjustable plant shelf kit on Amazon has everything you need to get started.
Written by Kate Smith | Plant Care Enthusiast & Urban Gardener