Creating a sustainable garden doesn’t require a large plot of land. In fact, knowing how to build a mini greenhouse for a small backyard can help you extend your growing season, protect delicate seedlings, and maintain control over your microclimate. This guide will walk you through the process with easy-to-follow steps, practical tips, and budget-friendly materials.
Why a Mini Greenhouse is Perfect for Small Spaces
A mini greenhouse is ideal for urban dwellers or anyone with limited outdoor space. It allows for:
- Controlled temperature and humidity
- Protection from pests and frost
- Efficient use of vertical and horizontal space
- Year-round growing potential for herbs, vegetables, and flowers
Additionally, you can repurpose common household items, making it a sustainable and affordable solution.
Materials You’ll Need
Before starting, gather these essentials:
- Wooden pallets or PVC pipes (for the frame)
- Clear plastic sheeting or old shower curtains
- Zip ties or weather-resistant tape
- Scissors or box cutter
- Hinges (if you plan to add a door)
- Potted plants or garden beds
💡 Tip: You can purchase affordable plastic sheeting and garden stakes from Home Depot’s gardening supplies section.
Step-by-Step: Building Your Mini Greenhouse
Step 1: Choose the Right Spot
Pick a location that receives at least 6 hours of sunlight daily. Avoid areas with strong wind currents or poor drainage.
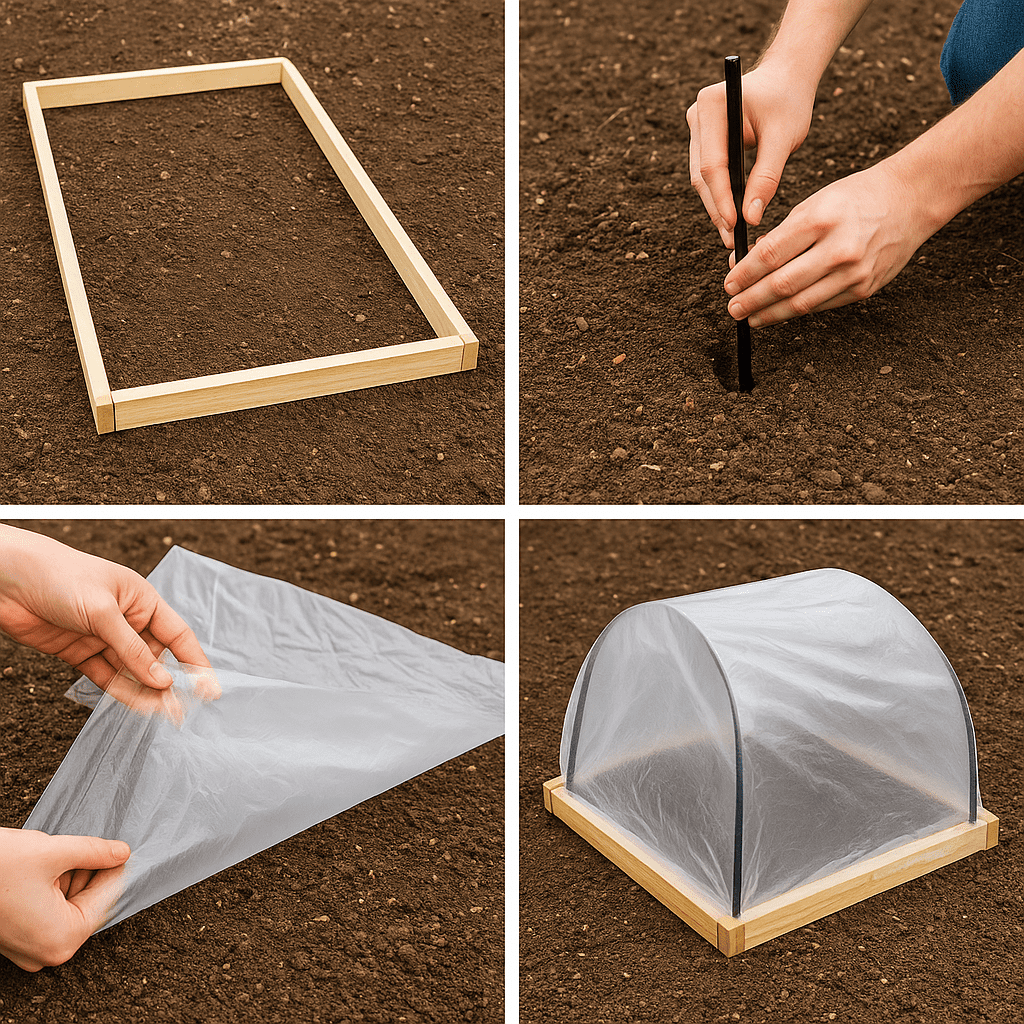
Step 2: Build the Frame
You can use PVC pipes bent into arches or create a cube using wooden pallets or scrap wood. For very small spaces, even a plastic storage container can be repurposed.
- For a freestanding model, secure the base with stakes.
- Ensure your frame is stable to hold the covering.
Step 3: Add the Covering
Wrap the entire structure with clear plastic sheeting. This material retains warmth and allows light to penetrate.
- Use zip ties or duct tape to secure it.
- Leave a flap or install hinges to serve as a door.
Step 4: Create Ventilation
Cut small openings that can be rolled up to allow airflow on hot days. This prevents overheating and promotes plant health.
Step 5: Organize Your Plants
Place potted plants or shallow raised beds inside. Add vertical shelves or hanging baskets to maximize space.
Creative Tips for Better Efficiency
- Use recycled bottles as self-watering containers.
- Install a small thermometer and hygrometer to monitor conditions.
- Reflective materials inside the greenhouse can improve light distribution.
- For very cold regions, consider adding a solar-powered heater or compost bin nearby for warmth.
Maintenance and Seasonal Adjustments
To keep your mini greenhouse functional year-round:
- Clean the plastic covering regularly to allow maximum sunlight.
- Rotate plants depending on the season.
- Replace torn plastic or weathered parts promptly.
- In summer, provide partial shading if temperatures spike.
Conclusion
With a little effort and creativity, building a mini greenhouse in your small backyard can drastically enhance your gardening potential. It’s an eco-friendly way to enjoy fresh produce, flowers, and herbs throughout the year.
Share this guide with a friend who dreams of growing their own garden in a compact space!
FAQ
1. How much does it cost to build a mini greenhouse?
Most DIY versions cost between $20 and $100, depending on the materials used. Repurposed items can reduce this further.
2. Can I use a mini greenhouse indoors?
Yes, especially near sunny windows or under grow lights. However, ventilation and moisture control are crucial.
3. What plants grow best in a mini greenhouse?
Lettuce, spinach, herbs, tomatoes, peppers, and seedlings are great candidates.
Helpful resource: For more smart layout tips, check out our guide on small garden layout ideas.
You can purchase affordable plastic sheeting and garden stakes for your mini greenhouse project from Home Depot’s gardening supplies section.
Written by Kate Smith | Plant Care Enthusiast & Urban Gardener