Creating a self-watering planter is one of the most efficient ways to keep your plants hydrated—especially if you’re busy or often forget to water them. The best part? You can make one yourself in just 10 minutes using recycled materials. In this guide, you’ll learn how to make a self-watering planter at home with simple tools and eco-friendly components.
Why Choose a Self-Watering Planter?
Self-watering planters offer a practical solution for maintaining healthy plants with minimal effort. They reduce the frequency of watering, prevent overwatering, and ensure that roots absorb water as needed. This method is ideal for people who travel often, live in hot climates, or are new to gardening.
Benefits at a Glance:
- Maintains consistent moisture levels
- Reduces water waste
- Promotes healthier root growth
- Ideal for herbs, flowers, and vegetables
- Great for upcycling plastic bottles
Materials You’ll Need
Before you begin, gather the following supplies. Most are common household items or easy to source inexpensively.
- 2-liter plastic bottle
- Cotton or nylon string (acts as a wick)
- Scissors or a craft knife
- Potting soil
- Seeds or seedlings
- Water
- Marker (optional)
Looking for durable cotton wick material? You can get it online here.
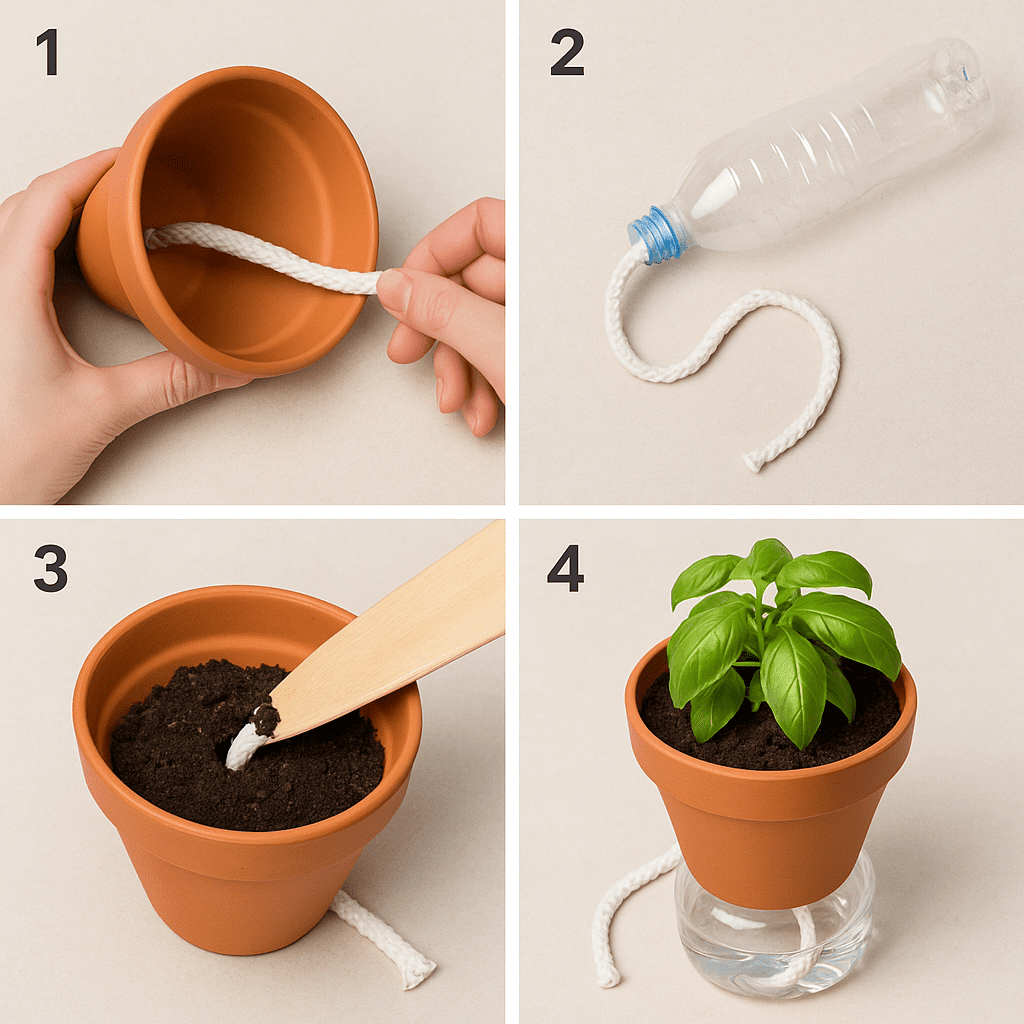
Step-by-Step Guide
Step 1: Cut the Bottle
Using scissors or a craft knife, cut the plastic bottle roughly ⅓ from the top. You’ll now have two pieces: the top part (which will hold the soil and plant) and the bottom part (which will store water).
Step 2: Insert the Wick
Thread a strip of cotton or nylon string through the bottle cap. Leave enough length on both ends so one side reaches into the water reservoir and the other stays in the soil. Screw the cap back on.
Step 3: Assemble the Planter
Place the top part of the bottle upside down into the bottom part. The wick should hang down into the bottom section, which will serve as the water reservoir.
Step 4: Add Soil and Plant
Fill the upper part with potting soil, ensuring the wick is buried. Then plant your seeds or seedlings as you would in a regular pot.
Step 5: Add Water
Pour water into the bottom reservoir. The wick will draw water up into the soil over time, keeping it evenly moist.
Tips for Better Results
- Use organic potting mix for better moisture retention.
- Clean the bottle thoroughly before use to avoid bacteria or mold.
- Place your planter in a sunny area suited to your plant’s needs.
- Refill the bottom with water when it’s almost empty—usually every 4–5 days.
Want more eco-friendly gardening ideas? Check out these small garden layout inspirations.
Creative Variations
- Paint the bottle for a decorative touch.
- Use glass jars for a more stylish indoor version.
- Add fertilizer to the water to create a slow-feeding system.
- Label each planter for different herbs or flowers.
If you enjoy creative gardening ideas, don’t miss our guide on pot painting ideas to personalize your garden.
Conclusion
Building a self-watering planter is fast, affordable, and eco-conscious. With just a few recycled materials and less than 10 minutes, you can create a smart watering solution for your plants that saves time and water—without sacrificing plant health.
Save this guide for your next planting weekend! Or share it with a friend who’s just starting out in gardening.
FAQ
Can I use a smaller bottle for this project?
Yes! Any size bottle works as long as you maintain the wick and reservoir design.
How often should I refill the water?
Most planters will need a refill every 4–5 days, but it depends on plant type and temperature.
What types of plants grow best in a self-watering planter?
Herbs, leafy greens, and flowers like marigolds and petunias thrive in self-watering setups.
Looking for quality cotton wicking rope for your planter? Find it here on Amazon at an affordable price.
Written by Kate Smith | Plant Care Enthusiast & Urban Gardener