Looking for a creative way to grow your plants while staying eco-friendly? Cute indoor planters you can make with household trash are a fun and sustainable solution. These upcycled creations not only reduce waste but also add a personal and artistic flair to your indoor garden. Whether you’re an avid plant lover or just getting started, this guide will walk you through practical ideas and step-by-step instructions for turning trash into treasures.
Why Use Household Trash for Planters?
Recycling household items into planters is both budget-conscious and environmentally responsible. Everyday items like cans, bottles, cartons, and jars often end up in landfills when they can easily be repurposed into charming containers for houseplants.
Key Benefits:
- Eco-Friendly: Reduces waste by reusing materials
- Cost-Effective: No need to buy new pots or décor
- Customizable: Paint, cut, and decorate to match your home aesthetic
- Unique Designs: No two planters look alike!
Materials You Can Reuse as Planters
Here are common household items that make excellent DIY planters:
- Tin cans (soup, beans, etc.)
- Glass jars (sauce, jam, pickles)
- Plastic bottles and jugs
- Egg cartons and milk cartons
- Old mugs or teacups
- Cardboard boxes
- Worn-out shoes or boots
Step-by-Step Instructions for 3 Cute DIY Planters
1. Tin Can Planter with a Rustic Finish
Materials Needed:
- Empty tin can
- Sandpaper
- Twine or rope
- Hot glue gun
- Potting soil and a small indoor plant
Instructions:
- Clean the can and remove the label completely.
- Sand down sharp edges with sandpaper.
- Wrap twine around the can and secure it with hot glue for a rustic finish.
- Add a drainage layer with pebbles before filling with soil.
- Insert your plant, water lightly, and place it on a windowsill.
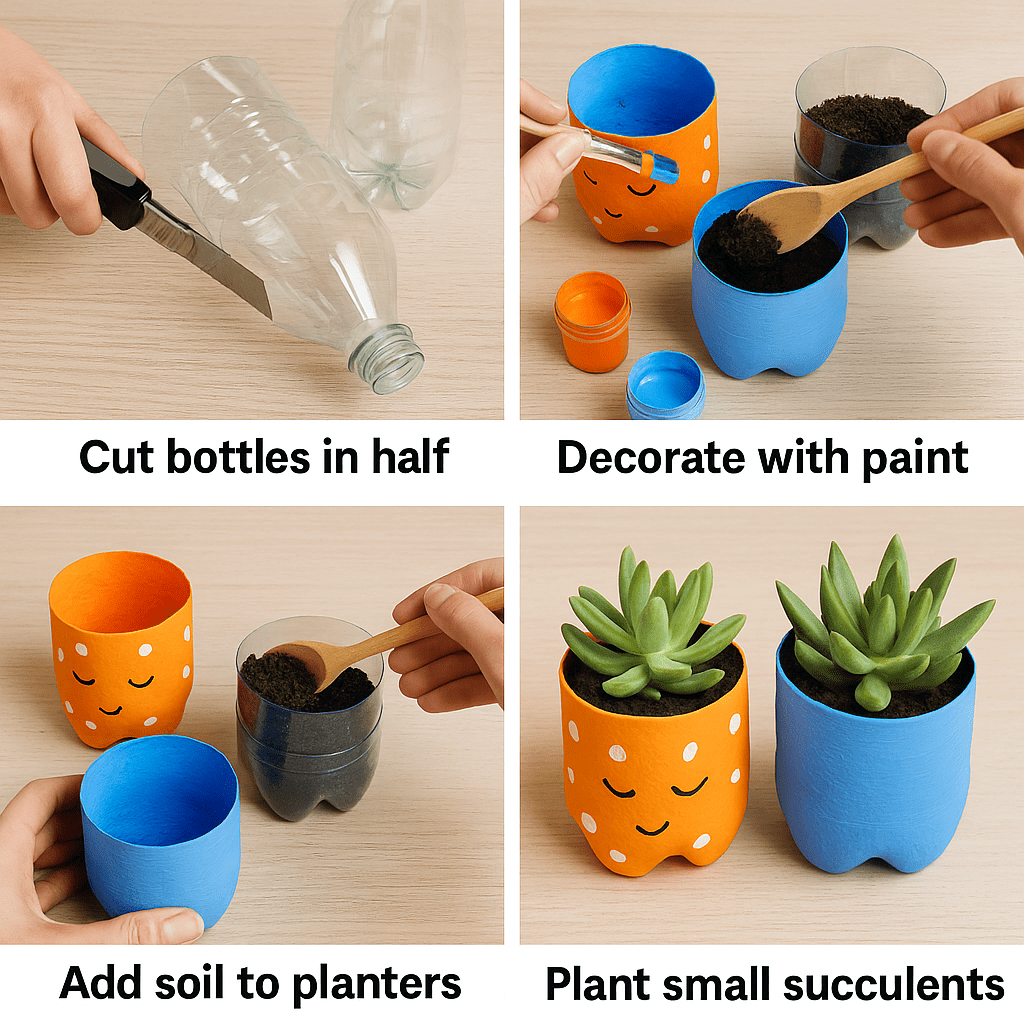
2. Plastic Bottle Hanging Planter
Materials Needed:
- 2-liter plastic bottle
- Scissors or craft knife
- String or yarn
- Paint and brushes
- Soil and trailing plants (like pothos)
Instructions:
- Cut out a rectangular window on the side of the bottle.
- Punch two holes near the top on both sides.
- Paint and decorate the bottle as desired and let it dry.
- Thread the string through the holes and tie securely.
- Add soil and a plant, then hang in a sunny area.
3. Glass Jar Succulent Planter
Materials Needed:
- Small glass jar
- Pebbles or sand
- Potting mix (specifically for succulents)
- Small succulent
Instructions:
- Layer pebbles at the bottom for drainage.
- Fill with potting mix, leaving room for the plant.
- Insert the succulent, pressing the soil gently.
- Clean the glass, place it on a shelf or windowsill.
Tips for Success
- Drainage: Add pebbles or drill holes to prevent waterlogging.
- Paint Safety: Use non-toxic paints if you’re planting edibles.
- Size Matters: Match the plant size with the container space.
- Labeling: Add cute handwritten labels for herbs or succulents.
Where to Display Your DIY Indoor Planters
- Kitchen windowsills for herbs
- Bathroom shelves for humidity-loving plants
- Living room corners for air-purifying greens
- Office desks for low-maintenance succulents
Looking for eco-friendly paints and crafting supplies? Visit EcoCraft World to explore a wide selection of sustainable materials.
Want to build a mini greenhouse for your small space? Check out our guide on How to Build a Mini Greenhouse for a Small Backyard.
Conclusion: Trash to Treasure with a Green Touch
Creating cute indoor planters from household trash is not just a craft—it’s a lifestyle. You reduce your environmental footprint while beautifying your home with greenery. Plus, it’s a great activity to do with kids or friends.
Save this guide for your next planting weekend—or share it with a friend who’s just starting out!
FAQ: Indoor Planters with Recycled Materials
Q1: Can I use containers without drainage holes?
Yes, just be sure to add a layer of gravel or activated charcoal to prevent root rot.
Q2: Are all plastic containers safe for plants?
Stick with food-grade plastics marked #1, #2, #4, or #5. Avoid #3, #6, and #7 as they may leach harmful chemicals.
Q3: How do I keep my planters looking cute over time?
Apply a sealant over painted surfaces and clean the outside regularly to maintain their appearance.
Written by Kate Smith | Plant Care Enthusiast & Urban Gardener