Growing your own vegetables at home is easier than you think. With the right setup and care, even those with limited space can enjoy fresh, homegrown produce. This complete guide to growing leafy greens in pots will show you how to cultivate healthy greens on a balcony, patio, or even a sunny windowsill.
Why Grow Leafy Greens in Pots?
Leafy greens are among the easiest and most rewarding plants to grow in containers. They grow quickly, require little space, and can be harvested multiple times. Growing them in pots also allows you to control soil quality, light exposure, and watering—ideal for beginners and urban gardeners alike.
Best Leafy Greens for Container Gardening
The following greens grow well in pots:
- Lettuce (butterhead, romaine, leaf)
- Spinach
- Arugula
- Kale
- Swiss chard
- Mustard greens
- Collard greens
These varieties thrive in containers and are ideal for repeated harvesting through “cut-and-come-again” methods.
What You Need to Get Started
Containers
Use pots that are at least 6–8 inches deep. Shallow-rooted greens don’t need a lot of space, but they do need room to spread. Ensure your containers have drainage holes to prevent root rot.
Potting Soil
Use high-quality, well-draining potting mix rich in organic matter. Avoid garden soil, which may compact in containers.
Location
Place the pots in a location that receives at least 4–6 hours of sunlight per day. Most leafy greens prefer cool weather and partial sun but still need adequate light.
Seeds or Seedlings
Both work well. Seeds are more economical, while seedlings offer a head start.
Step-by-Step: How to Grow Leafy Greens in Pots
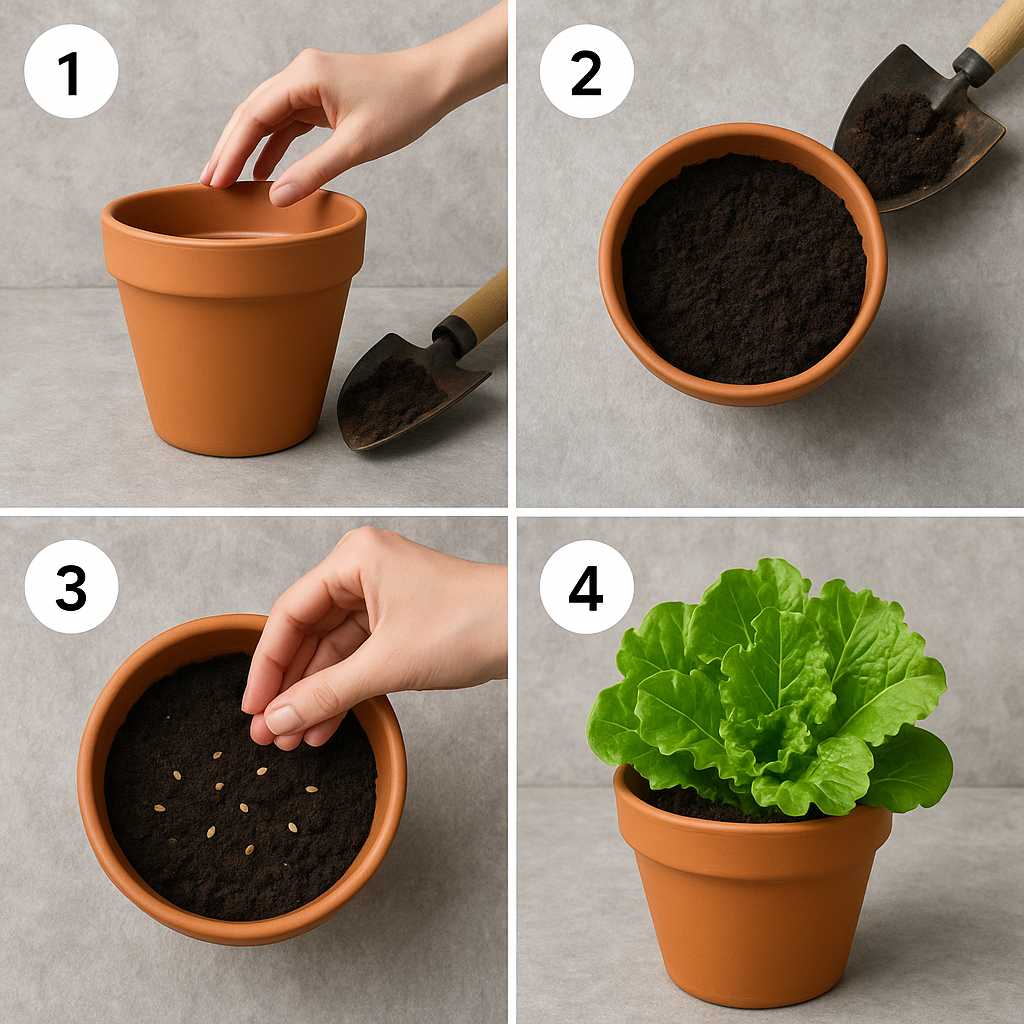
1. Choose and Prepare Your Pot
Clean the pot thoroughly and ensure drainage holes are open. Add a thin layer of gravel or small stones at the bottom (optional) to help drainage.
2. Add Soil
Fill the pot with potting mix, leaving about an inch of space at the top. Lightly moisten the soil before planting.
3. Plant Seeds or Seedlings
- For seeds: Follow packet instructions for spacing and depth.
- For seedlings: Gently transplant into soil, spacing them 4–6 inches apart.
4. Water Gently
Water the soil until it’s evenly moist but not soggy. Continue watering regularly, keeping the soil moist—especially during hot days.
5. Provide Light and Care
Place pots in a sunny area or under a grow light. Rotate regularly to ensure even growth. Fertilize lightly every 2–3 weeks using organic liquid fertilizer.
6. Harvest Smart
Harvest outer leaves first when the plant is mature enough, allowing the inner leaves to continue growing. This method encourages continuous harvests for several weeks.
Common Problems and Solutions
| Problem | Cause | Solution |
|---|---|---|
| Yellow leaves | Overwatering or poor drainage | Improve pot drainage and water less |
| Leggy growth | Lack of light | Move to a sunnier location |
| Pests (aphids, slugs) | Poor air circulation | Use neem oil or natural pest controls |
| Bitter taste | Hot temperatures | Grow during cooler months or provide shade |
Tips for Better Results
- Use self-watering containers for consistent moisture
- Mix different greens in one pot for variety
- Grow in succession every few weeks for a continuous harvest
- Move pots during the day to chase sunlight if needed
If you’re interested in sustainable gardening, don’t miss our tutorial on How to Make Plant Pots Using Recycled Aluminum Cans
Conclusion
This complete guide to growing leafy greens in pots proves that you don’t need a big garden to grow fresh, nutritious food. With just a few containers, some soil, and sunlight, anyone can enjoy delicious greens from their own home—perfect for healthy meals and sustainable living.
For high-quality organic potting soil ideal for leafy greens, check out this option on Amazon.