If you’re searching for a creative and durable way to add a personal touch to your garden or home decor, learning how to make cement planters at home is a rewarding DIY project. With the right materials and a step-by-step approach, you can craft unique planters in various sizes and shapes. In this article, you’ll learn everything from choosing the right cement to designing molds.
Why Choose Cement Planters?
Cement planters are not only modern and stylish but also extremely durable. Unlike plastic or ceramic pots, cement planters can withstand extreme temperatures and offer excellent drainage. Their neutral tones also allow plants to shine as the focal point.
Materials You’ll Need
Before starting, gather the following items:
- Portland cement
- Sand (fine grain)
- Water
- Mixing container and trowel or stick
- Mold containers (plastic bowls, boxes, or silicone molds)
- Inner molds (to shape the cavity)
- Cooking spray or oil (for easy release)
- Gloves and mask (for safety)
You can find quality Portland cement at affordable prices on Home Depot.
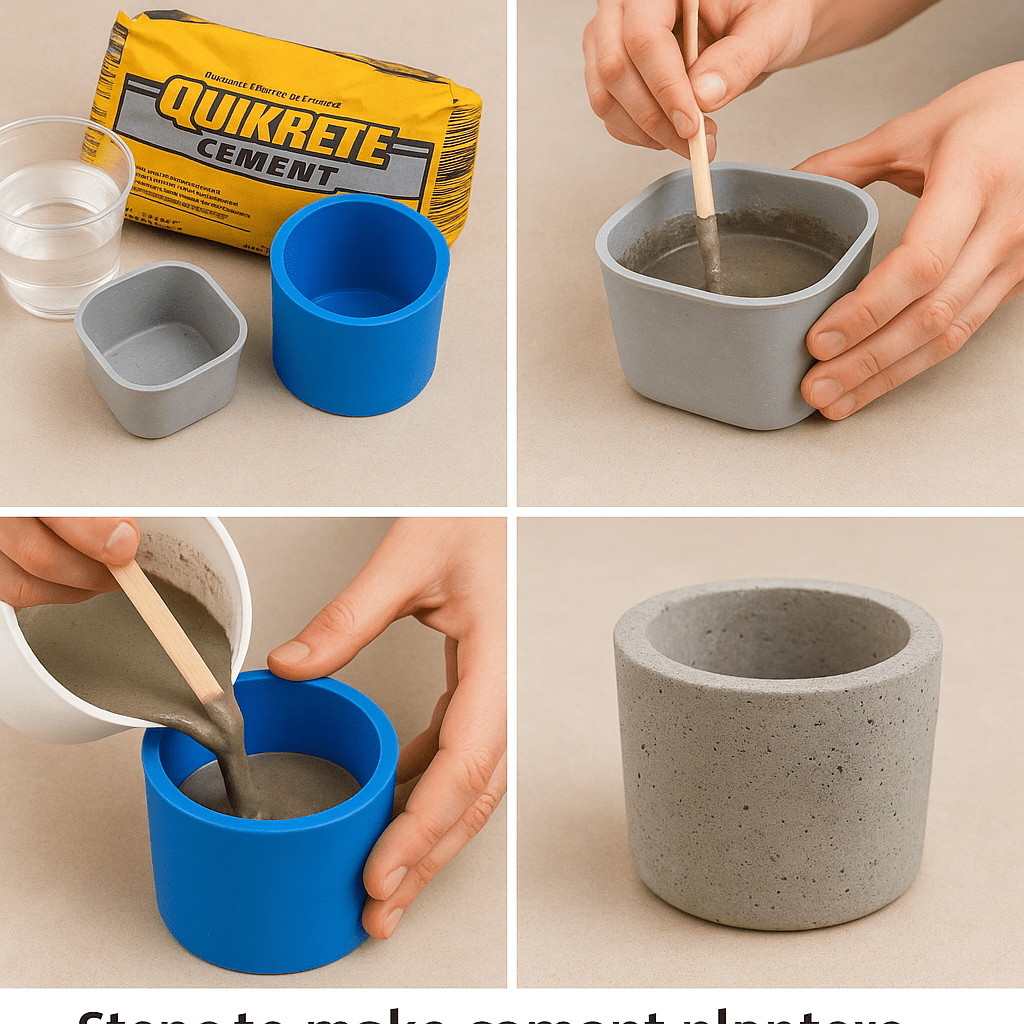
Step-by-Step Guide to Make Cement Planters
Step 1: Prepare the Molds
Choose your mold shapes based on your desired planter size. Spray the inner surfaces with cooking oil to prevent sticking. You’ll need one larger mold and a smaller one to create the planting cavity.
Step 2: Mix the Cement
Combine 2 parts cement with 3 parts sand in a container. Add water gradually and stir until the mixture has a thick, pancake-like consistency.
Step 3: Pour the Mixture
Fill the bottom of the large mold with some cement mixture. Press the smaller mold into the center to shape the cavity. Add more mixture around the sides to secure it in place.
Step 4: Tap and Set
Gently tap the mold on a flat surface to remove air bubbles. Let it set for 24–48 hours in a dry place.
Step 5: Demold and Cure
Carefully remove both inner and outer molds. Let the planter cure for 3–5 days to strengthen the cement.
Step 6: Finish the Surface
Use sandpaper to smooth rough edges. Optionally, paint or seal the planter for extra style and protection.
For more planter project inspiration, check out our internal guide: DIY Toy Cars from Plastic Bottles.
Tips for Mold Making
- Plastic food containers: Great for basic shapes
- Cardboard boxes: Use duct tape inside for waterproofing
- Silicone baking molds: Best for unique designs
- Recycled items: Yogurt cups, juice cartons, and more can all work
Common Mistakes to Avoid
- Using too much water (weakens the structure)
- Removing the mold too early (can crack)
- Forgetting mold release (makes demolding difficult)
- Not curing properly (reduces durability)
Creative Design Ideas
- Paint with pastel or metallic shades
- Use stencils to add designs before cement dries
- Embed small stones or glass pieces in the surface
- Mix in peat moss for a textured, aged look
If you’re looking for more creative planter ideas, check out our guide on hanging planters made from old bottles.
Conclusion
Making your own cement planters is an enjoyable, cost-effective project that adds personality to your garden. Whether you want to grow herbs, succulents, or small flowers, these sturdy DIY pots are built to last.
Save this guide for your next planting weekend or share it with a friend who’s just starting out!
FAQ
Q: Can I use quick-set cement for planters?
A: Yes, but work fast as it sets in minutes. Ideal for small molds only.
Q: What plants grow best in cement planters?
A: Succulents, cacti, and herbs thrive in them due to excellent drainage.
Q: How do I waterproof cement planters?
A: Use a concrete sealer or waterproofing agent after curing.
You can purchase high-quality silicone molds for your cement planters here to get started with your project easily.
Written by Kate Smith | Plant Care Enthusiast & Urban Gardener