Maintaining consistent moisture is one of the biggest challenges in plant care—especially for busy people or forgetful waterers. Learning how to make self-watering plant pots at home is a smart, sustainable solution that keeps your plants hydrated for days without daily effort. This DIY guide is affordable, beginner-friendly, and ideal for both indoor and outdoor setups.
Why Use Self-Watering Pots?
Self-watering planters have a water reservoir at the bottom that allows plants to absorb moisture as needed through capillary action. This system:
- Reduces the risk of overwatering or underwatering
- Promotes deeper root growth
- Saves time and water
- Keeps foliage dry—ideal for sensitive plants
What You’ll Need
To create a simple DIY version, gather the following materials:
- Two plastic containers (one smaller than the other) or one bottle
- Cotton string, nylon cord, or a strip of cloth (for wicking)
- Potting soil
- Plants or seeds
- Drill or knife to make holes
- Optional: activated charcoal to prevent odors
Method 1: Double Container System
1. Prepare the Wicking Material
Cut a cotton string or fabric strip about 6–8 inches long. This will draw water from the reservoir into the soil.
2. Drill or Cut a Hole
Make a hole in the bottom of the inner container (the one that will hold the plant and soil).
3. Insert the Wick
Thread the wick through the hole so that a few inches hang below into the water reservoir and the rest stays in the soil.
4. Assemble the System
- Place the inner container inside the larger one (which will act as the reservoir)
- Add water to the bottom container
- Fill the inner container with soil and plant as usual
5. Top Off the Reservoir as Needed
Check the water level every few days and refill when it’s low.
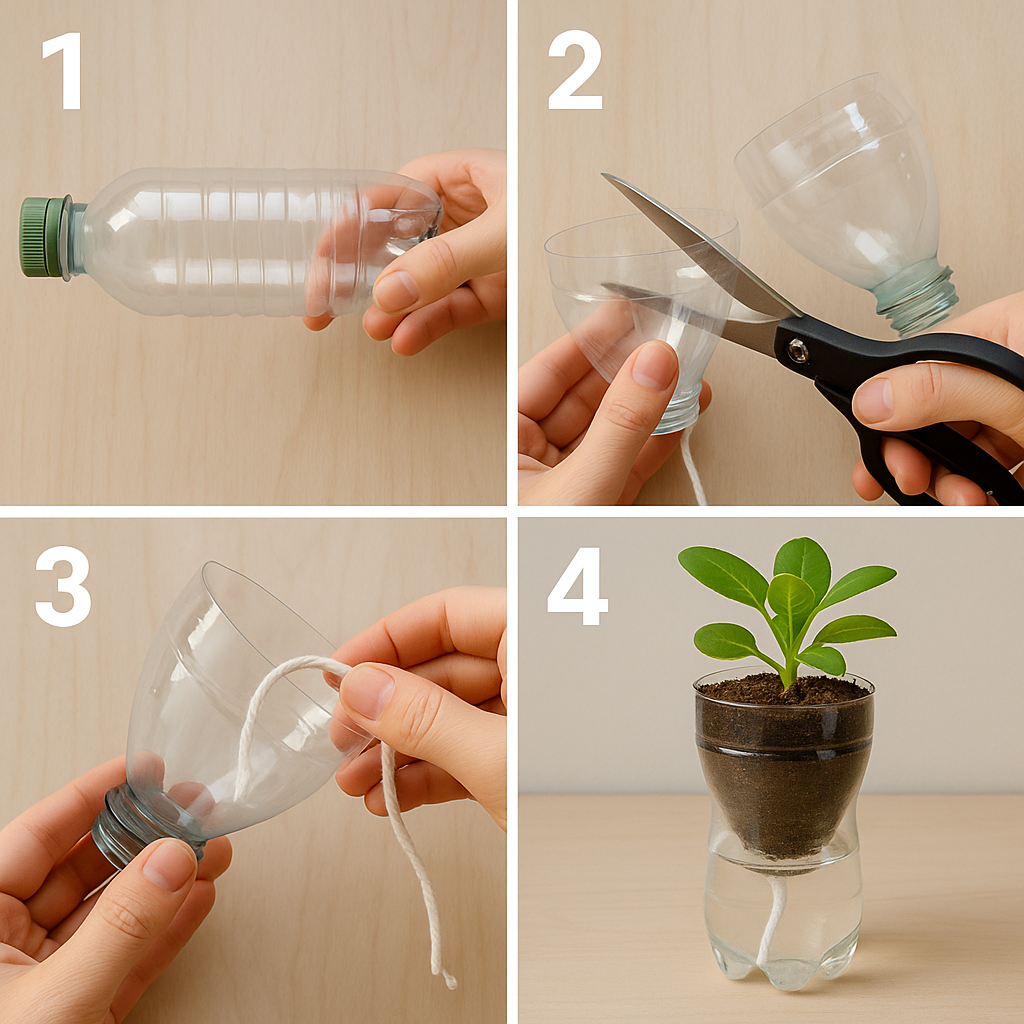
Method 2: Recycled Plastic Bottle System
1. Cut the Bottle in Half
Use a craft knife or scissors to cut a large plastic bottle around the middle.
2. Insert the Wick
Thread the wick through the bottle cap (poke a hole if needed). Secure it tightly.
3. Assemble the System
- Invert the top half and place it upside down into the bottom half
- Fill the bottom with water
- Add soil and plant to the top portion
This setup is perfect for herbs, small leafy greens, and succulents.
Maintenance Tips
- Refill the reservoir when the top soil starts to dry
- Clean the container monthly to prevent algae buildup
- Use wicking material that doesn’t decompose quickly
- Choose appropriate plant types—most houseplants love consistent moisture
Best Plants for Self-Watering Pots
- Herbs (basil, mint, parsley)
- Leafy greens (lettuce, spinach)
- Peace lilies
- Spider plants
- Pothos
- African violets
For more clever indoor gardening ideas, check out our guide on Creative Pot Ideas for Small Spaces.
Final Thoughts
Mastering how to make self-watering plant pots at home gives you more freedom and your plants more stability. With just a few simple materials, you can create effective, eco-friendly planters that reduce stress, save time, and help your indoor jungle thrive—even when life gets busy.
Looking for affordable materials to build your self-watering plant pots? You can buy cotton wicks and plastic containers here.
[…] Want to learn how to use one of these tools in a DIY project? Check out our step-by-step guide on How to Make Self-Watering Plant Pots at Home. […]
[…] For more creative pot transformation ideas, check out our article on https://quickadvicedaily.com/how-to-make-self-watering-plant-pots-at-home/ […]