Looking for a creative and eco-friendly way to grow your plants? Making plant pots using recycled aluminum cans is a simple and sustainable DIY project that helps reduce waste while adding a personal touch to your garden or home décor. In this guide, we’ll walk you through the step-by-step process to transform used cans into stylish and functional plant containers.
Why Use Recycled Aluminum Cans for Plant Pots?
Aluminum cans are lightweight, durable, and readily available in most households. Instead of sending them to the recycling bin or landfill, you can upcycle them into beautiful and practical planters. This not only benefits the environment but also saves money on gardening supplies.
Benefits of DIY Aluminum Can Planters
- Eco-conscious: Reduces metal waste and promotes recycling
- Cost-effective: Reuses materials you already have
- Compact and space-saving: Perfect for windowsills, balconies, or small spaces
- Customizable: Easy to paint or decorate for a personal touch
- Beginner-friendly: Requires minimal tools and skills
Materials You Will Need
- Empty aluminum cans (e.g., soda cans)
- Can opener or utility knife
- Nail and hammer or drill (for drainage holes)
- Sandpaper
- Acrylic paint or spray paint (optional)
- Potting soil
- Small plants or seeds
Step-by-Step: How to Make Plant Pots from Aluminum Cans
1. Clean and Prepare the Cans
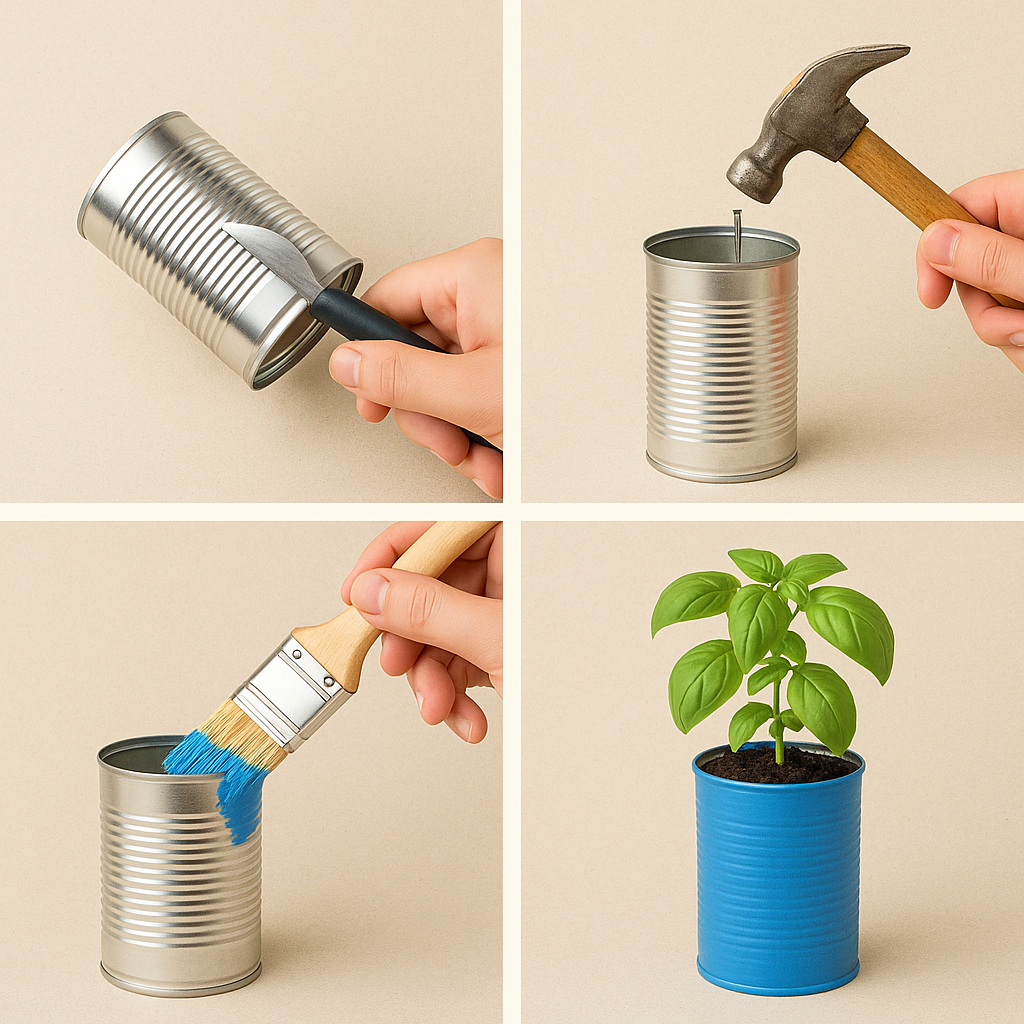
Rinse the cans thoroughly to remove any residue. Let them dry completely. Remove any sharp edges from the top using a can opener or pliers.
2. Smooth the Edges
Use sandpaper to smooth out the rim and any rough spots to prevent cuts or damage to plants. This step is especially important if children will help with planting.
3. Add Drainage Holes
Using a hammer and nail or a drill, carefully make 2–3 small holes at the bottom of each can. This will prevent water buildup and help keep plant roots healthy.
4. Decorate (Optional)
If desired, decorate your cans using acrylic paint, spray paint, or washi tape. Let them dry completely before adding soil. You can also label them with the name of the plant.
5. Fill and Plant
Add potting soil up to about two-thirds of the can. Plant your seeds or small plants, then fill in around them with more soil. Gently press the soil and water lightly.
6. Display and Maintain
Place the cans on a tray or plate to catch any excess water. Keep them in a sunny spot and water according to your plant’s needs. Rotate periodically for even light exposure.
Best Plants for Aluminum Can Pots
- Herbs: Basil, mint, parsley, thyme
- Succulents: Jade, echeveria, aloe
- Small flowers: Marigolds, pansies, petunias
You can buy non-toxic acrylic paint for decorating your aluminum cans here on Amazon.
Tips for Success
- Don’t skip the drainage holes — they’re critical to avoid root rot.
- Use indoor-safe paints to avoid chemical leaching.
- For outdoor use, spray a waterproof sealant after decorating.
- Reuse cans seasonally by replacing soil and rotating crops.
Conclusion
Making plant pots using recycled aluminum cans is an accessible and rewarding way to start gardening while caring for the environment. It’s a perfect project for DIY enthusiasts, families, or anyone looking to reduce waste and add greenery to their space.
If you enjoy eco-friendly gardening, don’t miss our tutorial on How to Make a Vertical Garden Using Plastic Bottles.
[…] Want more eco-friendly plant care tips? Read our guide on https://quickadvicedaily.com/plant-pots-using-recycled-aluminum-cans/ […]
[…] For another creative and eco-friendly idea, check out our guide on Plant Pots Using Recycled Aluminum Cans. […]
[…] If you’re interested in sustainable gardening, don’t miss our tutorial on How to Make Plant Pots Using Recycled Aluminum Cans […]
[…] For another creative container idea, check out our guide on Plant Pots Using Recycled Aluminum Cans. […]