Starting seeds indoors is a smart and rewarding way to get a head start on your garden. Not only does it give your plants a longer growing season, but it also saves money and offers a satisfying sense of accomplishment. In this guide, we’ll walk you through every essential step to ensure your seed-starting journey is a success.
Why Start Seeds Indoors?
Starting seeds indoors is especially beneficial for gardeners in colder climates or those with shorter growing seasons. It allows you to:
- Control the growing environment
- Grow rare or heirloom varieties not available in local nurseries
- Avoid pests and unpredictable weather during the seedling stage
- Time your transplants for optimal outdoor conditions
What You’ll Need
Before you begin, gather the following materials:
- Seed packets (choose varieties suited to your climate)
- Seed-starting mix (lightweight, well-draining, sterile)
- Seed trays or containers with drainage holes
- Clear plastic domes or plastic wrap
- Grow lights or a sunny windowsill
- Water spray bottle
- Labels or markers for plant identification
You can find seed-starting kits and supplies at this gardening retailer.
Choosing the Right Seeds
Select seeds based on your growing zone, available space, and preferences. Some popular choices for beginners include:
- Tomatoes
- Peppers
- Lettuce
- Basil
- Zinnias
- Marigolds
Check the seed packet for specific instructions on timing and planting depth.
Step-by-Step: How to Start Seeds Indoors
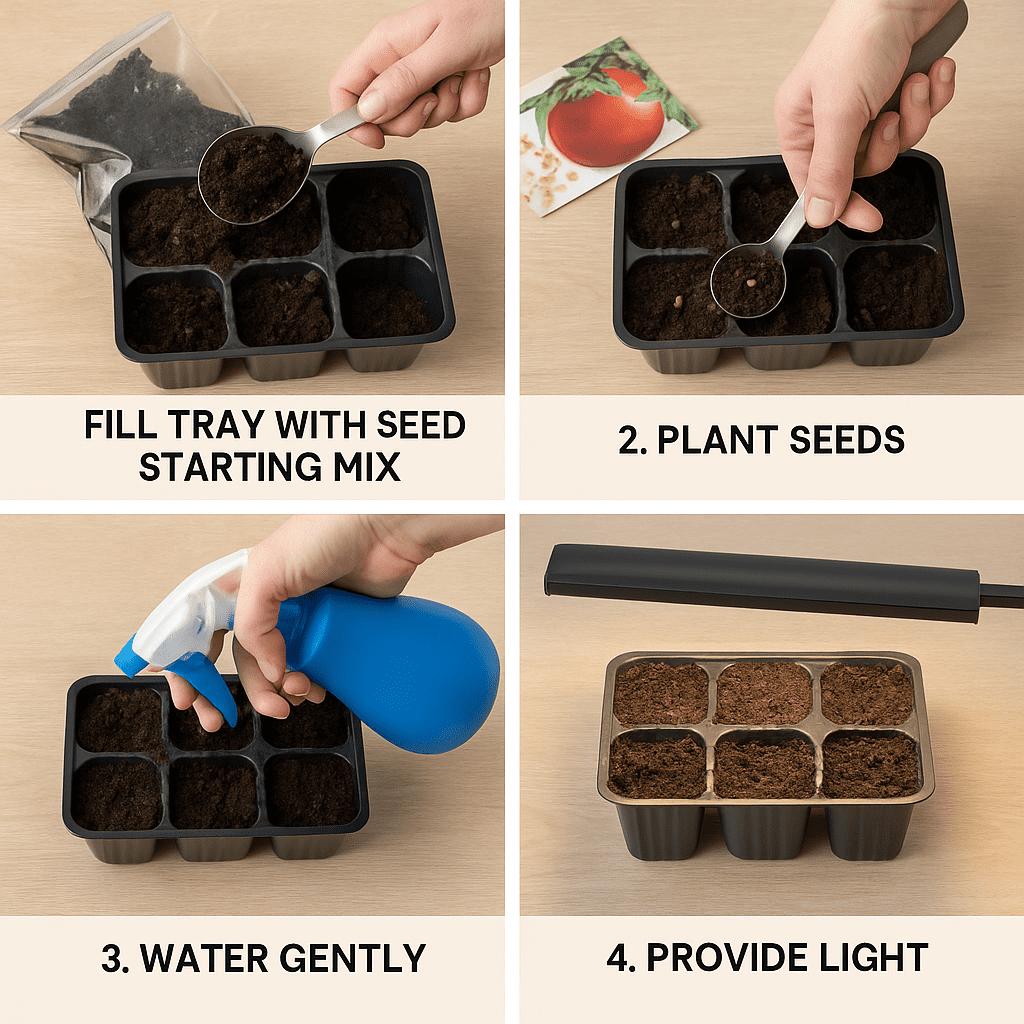
Step 1: Prepare Your Containers
Start by filling your seed trays or containers with damp seed-starting mix. Be careful not to compact the soil.
Step 2: Sow the Seeds
Next, plant your seeds at the depth recommended on the seed packet. Gently press them into the mix, cover lightly, and don’t forget to label each row or container.
Step 3: Provide Warmth and Humidity
To retain moisture, cover the containers with a plastic dome or plastic wrap. Keep them in a warm area (65–75°F/18–24°C) until the seeds sprout. Once seedlings emerge, remove the cover to improve airflow.
Step 4: Ensure Adequate Light
Position grow lights 2–3 inches above the seedlings to encourage even growth. If using a windowsill, rotate the trays daily. Aim for 12–16 hours of light per day.
Step 5: Water Carefully
Use a spray bottle or a bottom-watering tray. Maintain moisture without letting the soil become waterlogged.
Step 6: Thin and Feed
As true leaves appear, snip off the weaker seedlings to give the stronger ones room. Begin feeding them with a diluted liquid fertilizer two to three weeks in.
Step 7: Harden Off
Before planting outdoors, gradually introduce the seedlings to outside conditions. Start with a few hours in a sheltered area, increasing their exposure to sunlight and wind over a week to 10 days.
Common Mistakes to Avoid
- Overwatering, leading to damping-off disease
- Starting too early (check frost dates!)
- Using garden soil instead of sterile mix
- Inadequate lighting
When to Transplant Outdoors
Transplant after the last expected frost date when:
- Seedlings have at least two sets of true leaves
- Temperatures are consistently warm
- Soil is workable and enriched
For more beginner-friendly gardening tips, check out our guide on how to start a home garden from scratch.
Conclusion
Starting seeds indoors opens the door to a thriving and customizable garden. With a little care and patience, you’ll enjoy healthy plants ready to flourish in your outdoor space.
Share this guide with a friend who’s ready to take their first gardening steps!
FAQ
Q: Do I need grow lights to start seeds indoors?
A: While natural sunlight can work, grow lights provide consistent, strong lighting essential for healthy seedling development.
Q: How long does it take for seeds to germinate?
A: It depends on the variety, but most common vegetables germinate within 5-14 days.
Q: What is damping-off, and how can I prevent it?
A: Damping-off is a fungal disease that causes seedlings to collapse. Prevent it by using sterile mix, avoiding overwatering, and providing good airflow.
You can find affordable seed starting kits and grow lights here on Gardener’s Supply Company.
Written by Kate Smith | Plant Care Enthusiast & Urban Gardener
[…] Want to take the next step? Learn how to start seeds indoors with our complete beginner guide to indoor seed starting. […]
[…] If you’re starting from scratch, don’t miss our guide on starting seeds indoors. […]