Creating a vertical garden using plastic bottles is a brilliant way to save space, reduce waste, and grow fresh herbs or small plants at home. This sustainable DIY project is perfect for balconies, small backyards, or even indoor walls, making it ideal for urban gardening enthusiasts. In this guide, you’ll learn step-by-step how to reuse plastic bottles to build a beautiful and functional vertical garden.
Why Choose a Vertical Garden with Plastic Bottles?
Plastic bottles are durable, easy to find, and often end up in landfills. Turning them into planters gives them a second life and helps reduce environmental impact. A vertical garden made from plastic bottles is not only eco-friendly but also highly customizable and cost-effective.
Benefits of a Plastic Bottle Vertical Garden
- Saves space: Ideal for small homes or apartments.
- Low cost: Uses materials you probably already have at home.
- Eco-friendly: Reduces plastic waste.
- Easy maintenance: Allows easy watering and care.
- Versatile: Suitable for herbs, leafy greens, and small flowers.
Materials You Will Need
To get started, gather the following supplies:
- 2-liter plastic bottles (clean and label-free)
- Scissors or utility knife
- String, wire, or rope
- Small nails or hooks
- Potting soil
- Small plants or seeds (e.g., basil, mint, lettuce)
- Marker
- Drill (optional for holes)
You can buy quality potting soil for your vertical garden here on Amazon.
Step-by-Step: Building Your Vertical Garden
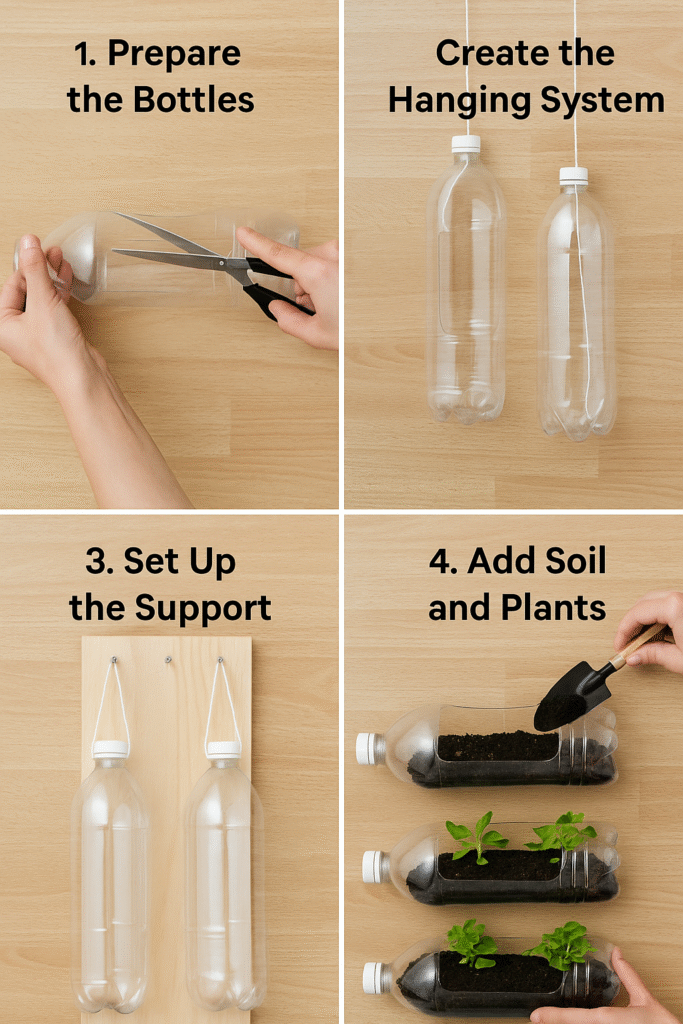
1. Prepare the Bottles
- Wash and dry the plastic bottles thoroughly.
- Using a marker, draw a rectangular opening on one side of the bottle (large enough to hold soil and a small plant).
- Carefully cut the opening with scissors or a utility knife.
Optional: Drill small holes in the bottom for drainage.
2. Create the Hanging System
- Make two small holes near the top and two near the bottom of each bottle (on the narrow sides).
- Thread string or wire through the holes so that each bottle hangs horizontally, with the opening facing up.
- Tie knots securely, allowing enough spacing between each bottle when stacked vertically.
3. Set Up the Support
- Attach hooks or nails to a wall, fence, or wooden board where the garden will be installed.
- Hang the first bottle at the top and continue layering downward.
- Make sure each bottle is level and stable.
4. Add Soil and Plants
- Fill each bottle with a small amount of potting soil.
- Plant herbs or small vegetables into the soil.
- Water gently and monitor moisture regularly.
5. Maintain Your Garden
- Water from the top so that excess water trickles down to the bottles below.
- Prune plants regularly to encourage healthy growth.
- Rotate plants occasionally for even sunlight exposure.
Best Plants for a Vertical Bottle Garden
- Herbs: Basil, thyme, cilantro, mint
- Greens: Spinach, lettuce, arugula
- Flowers: Marigold, petunia, pansies
Tips for Success
- Use good-quality potting soil with nutrients.
- Choose a spot with 4–6 hours of sunlight daily.
- Add organic compost for better plant health.
- Replace soil every season for best results.
If you enjoy sustainable gardening, check out our article on How to Make a Mini Herb Garden Using Aluminum Cans.
Conclusion
A vertical garden using plastic bottles is a practical, eco-conscious, and creative way to grow your own plants, especially in limited spaces. With just a few materials and a little time, you can turn everyday waste into a lush, living wall that adds beauty and freshness to your home.